Using a render farm can feel simple from the outside. You upload a Blender project, start the job, wait for the frames, and download the result.
But for many artists and studios, the real question is not only how fast the render finishes.
The bigger question is: what happens to my files?
This is one of the most important topics in cloud rendering, but it is also one of the least explained. Many render farms talk about speed, GPU power, or pricing, but they do not clearly show what happens to your project after upload. For real production work, that lack of transparency can create serious concerns.
A Blender scene is not just one file. It can include linked textures, HDRIs, caches, scripts, custom assets, simulation data, addons, and sometimes confidential client work. When you send that project to a render farm, you need to know how the system handles it.
This article walks through the process step by step.
Step 1: Your project is prepared before upload
Before a Blender project can be rendered in the cloud, all required files need to be collected correctly. This is already one of the most important parts of the whole process.
A .blend file alone is often not enough. If your scene uses external textures, linked assets, simulation caches, HDRIs, Alembic files, image sequences, or other dependencies, the render farm needs access to those files too. Otherwise, the project may open on the render node, but it will not render the same way it does on your local machine.
This is why many Blender render farm problems start before the render even begins.
Locally, Blender may find files because they are sitting somewhere on your computer. In the cloud, that local path does not exist. A texture stored on your desktop, a cache saved in another folder, or a missing addon dependency can cause broken materials, missing objects, or failed frames.
A good render farm should make this process as automatic and clear as possible. The goal is not just to upload a file. The goal is to upload everything the render job actually needs.
Step 2: Your files are uploaded to cloud storage
Once the project is prepared, the files are uploaded to cloud storage. This upload usually contains the Blender project and the required assets packed or collected together.
At this stage, the render farm should treat the upload as temporary production data, not as permanent storage.
This matters because artists often work with sensitive files. These can include unreleased animations, client product visuals, commercial campaigns, architectural designs, or internal studio assets. A render farm should not behave like a public file-sharing platform. It should handle the upload as part of a rendering workflow with a clear purpose.
The upload exists so that the render nodes can access the project, process the frames, and return the results.
Step 3: The render farm distributes the job
After the upload is complete, the render farm prepares the job for rendering. For animation projects, this usually means splitting frames across multiple machines or GPUs.
This is where a render farm becomes powerful.
Instead of one local computer rendering frame 1, then frame 2, then frame 3, multiple nodes can work at the same time. One node may render frame 1, another renders frame 2, another renders frame 3, and so on. For Blender animations, this can reduce waiting time dramatically.
In simple terms, the distribution process usually includes:
- The render job is created from your uploaded project.
- The system assigns frames or frame ranges to available render nodes.
- Each node downloads only what it needs to render its assigned work.
- The completed frames are uploaded back to cloud storage for download.
This is also where security and system design matter. The render nodes need temporary access to the project files, but that access should exist only for the purpose of completing the render.
Step 4: The render nodes open and render the scene
Once a node receives its task, it opens the project in the correct rendering environment. For Blender, that means the node needs a compatible Blender version, the right render engine support, and access to the files needed by the scene.
This is where many cloud render failures happen.
A render can fail even if the project works perfectly on your own computer. That does not always mean the render farm is slow or weak. It often means the cloud environment does not match the local environment closely enough.
Common problems include missing linked textures, unsupported addons, different Blender versions, broken cache paths, unsupported output settings, missing fonts, or Python scripts that behave differently in a headless rendering environment.
This is why file handling and environment handling belong together. A secure upload process is important, but it is not enough. The render farm also needs to understand how real Blender production projects are built.
Step 5: Finished frames are sent back to storage
As frames finish, they are sent back to cloud storage so you can download them.
This part of the process should also be clear. Your project files and your final rendered results are different types of data.
The project files are needed for rendering. The output files are needed so you can download your finished work. A transparent render farm should explain how long those files remain available, what happens after that, and whether the user can remove them manually.
For artists and studios, this is important because the rendered frames may also be sensitive. They could show unreleased work, client campaigns, product designs, or scenes that are not meant to be public yet.
A good render farm should not only focus on finishing the render. It should also make it easy to understand where the finished files are stored and how long they are kept.
Step 6: Temporary files should be deleted after rendering
This is the step many render farms do not explain clearly.
After a render node finishes its work, the project data should not stay on that node longer than necessary. The files were sent there to render frames. Once that job is done, they should be removed from the rendering machine.
This matters because render farms often use multiple machines. If your project is distributed across several nodes, your files may temporarily exist on several machines during the render. That is normal for distributed rendering, but it also means deletion rules need to be clear.
A transparent system should answer questions like:
- Are project files deleted from the nodes after rendering?
- How long are finished frames available for download?
- Can users manually remove finished files?
- Does the system keep files longer than needed?
These questions should not be hidden in vague security statements. They should be part of the product explanation, because trust is part of the rendering experience.
Why file transparency matters for Blender artists
Blender artists often build complex scenes over many weeks or months. A production file may contain far more than geometry and materials. It may include custom node systems, procedural assets, paid addons, scripts, client references, simulations, and creative decisions that are valuable by themselves.
That is why security concerns are not just technical concerns.
They are business concerns.
A freelancer may need to protect client work. A studio may need to follow internal production rules. A university may need to protect student projects. A company may be working on an unreleased product launch. In all of these cases, the render farm is not just processing pixels. It is temporarily handling valuable work.
This is also why transparency can become a competitive advantage. Artists do not only want a fast Blender render farm. They want to understand what happens behind the upload button.
The problem with vague render farm promises
Many render farms make the process sound very simple. Upload your project, render faster, download your frames.
That is true on the surface, but it leaves out the details that actually matter when something goes wrong.
If a render fails, users often do not know whether the problem came from missing files, wrong settings, unsupported addons, version mismatch, or a cloud-side issue. If security is unclear, they also do not know where their files were stored or whether they were deleted after the job.
This creates unnecessary uncertainty.
For casual test scenes, that may not matter much. For real production work, it matters a lot.
A serious render farm should make the process understandable before the user has to ask. It should explain what gets uploaded, how the job is distributed, how rendering happens, where results are stored, and what gets deleted after the render is complete.
How Praxilla succeeds where others fail
Praxilla is built around the idea that cloud rendering should not feel like sending your project into a black box.
For Blender users, the upload process happens directly through the Praxilla addon, which helps make the workflow more straightforward. Your project is prepared for rendering, uploaded, distributed across multiple GPUs, and processed by render nodes that work on the assigned frames.
The important part is that files do not stay on the rendering nodes after the render is complete.
During rendering, the nodes temporarily receive the files they need to process their assigned frames. Once the rendering on a node is finished, the project files and rendered output are removed from that node. Nothing stays there after the job is complete.
The finished results are moved to secure cloud storage so the customer can download them. They stay available there until the customer removes the job manually, or they are automatically deleted after 2 weeks.
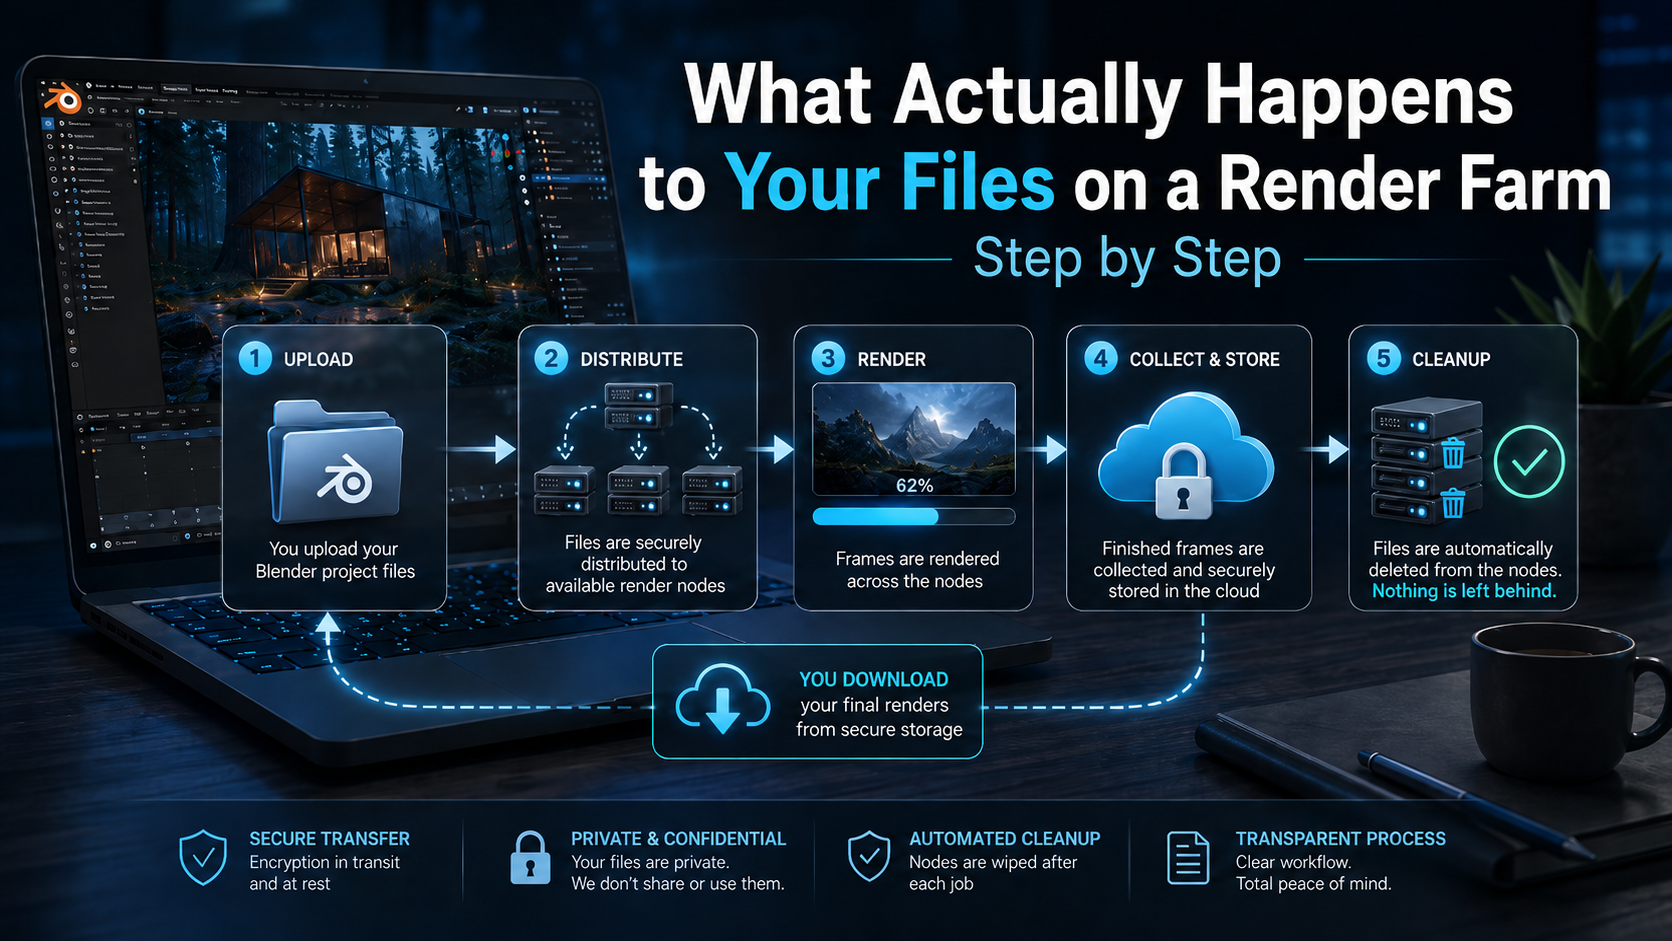
This gives artists a clearer understanding of the full process:
- Upload your Blender project and required assets.
- Distribute the frames across Praxilla’s rendering network.
- Render the frames on multiple GPUs.
- Move the finished results to secure storage for download.
- Delete all temporary files from the rendering nodes after rendering is complete.
- Keep the downloadable results in secure storage until manual removal or automatic deletion after 2 weeks.
That is the difference between simply offering GPU power and offering a render workflow artists can trust.
Speed matters, but speed alone is not enough. A render farm also needs to handle files properly, support real Blender production scenes, explain what happens behind the scenes, and make the whole process understandable for the people trusting it with their work.
Want to learn more?
If you want to see how Praxilla works for Blender projects, you can learn more here:
Learn more about Praxilla support for Blender:
https://praxilla.io/blender-render-farm
Estimate how much time your render could take with the cost calculator:
https://praxilla.io/cost-calculator
Check Praxilla prices and rendering hour packages:
https://praxilla.io/prices